Tim Parkin introduces one of Photoshop's core features

Tim Parkin
Tim Parkin is a British landscape photographer, writer, and editor best known as the co-founder of On Landscape magazine, where he explores the art and practice of photographing the natural world. His work is thoughtful and carefully crafted, often focusing on subtle details and quiet moments in the landscape rather than dramatic vistas. Alongside his photography and writing, he co-founded the Natural Landscape Photography Awards, serves as a judge for other international competitions. Through all these projects, Parkin has become a respected and influential voice in contemporary landscape photography.
In our second post processing instalment, we take a closer look at curves for contrast adjustments and targeted brightening and darkening of the image.
Many people have learned to use various Photoshop blending modes to make contrast or brightness changes but there are a couple of reasons that curves *may* be a better solution.
The first is that duplicating the picture layer - in order to use as a blending mode - doubles the size of the Photoshop file (and hence doubles the memory requirement). A global curves adjustment layer does not increase the file size by any significant amount (we’re talking less than 1% increase). The other advantage of curves is that it is easy to work out what adjustments to make (once you learn a few guidelines) and it is also less likely to destroy information in an image as you saw in the previous article.
Having learned to make some simple adjustments in the last article, we will now try to limit the effect of these adjustments so they only affect the areas needed. In order to do this, we will have to talk about masks.
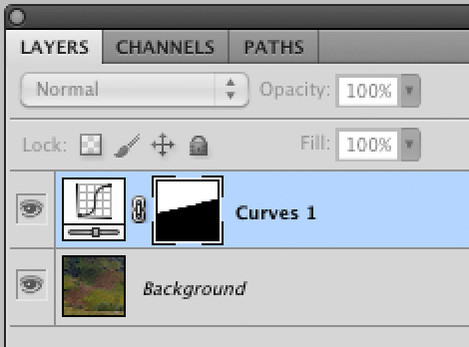
Masks in Photoshop are simply layers that control where to apply adjustments. A mask is a black and white layer where white parts allow 100% of the adjustment to be applied and black areas block the adjustment completely.
Let’s take a look at one of the simplest ways of creating a masked adjustment layer. The following short video shows a selection is made (using the ‘polygonal lasso’ tool) and then an adjustment layer is added. These two steps automatically create a masked selection and this technique works for any adjustment layer, not just curves.
Obviously, this mask is going to be useless for nearly all of our photography post processing because we have a hard edge. Nearly all masks used in post processing will be soft and the next step is to show you a few ways to create a soft edge.
The first method is to apply the edge softness when you make the selection. When you are in a selection mode (either square, ellipse, lasso or polygonal lasso) there will be an option in the tool options bar for ‘feather’. Feathering is a term in woodwork which means ‘to thin an edge’. In Photoshop's case it is the equivalent to blurring the edge of the section so that a 100px feather will make the selection softer such that instead of going from full selection to no selection over a single pixel, it does so over 100px with the area under the selection edge ending up 50% selected. With a value in the feather box, as soon as you complete a selection, the feather is applied.
The other way to do this is to manually add a feather after making the selection using ‘refine edge’ (this tool has changed slightly in each version of Photoshop since CS2 I believe). The refine edge has a ‘feather’ slider.
Finally, you can apply the feather to the adjustment mask directly. Click on the mask icon that sits alongside the adjustment icon in the layers panel use the blur tool to feather the edges. If you want to see what you are doing, just ‘alt+click’ on the mask and you should get a black and white view of the mask or you can ‘alt+shift+click’ on the layer to get a ‘rubylith’ (a red overlay showing the selection). repeat the alt+click or alt+shift+click to get back to normal.
The following video shows some of these techniques and a couple of extra tricks.
If you already have a curves layer that you have added and want to mask separately, you can use the ‘Layer > Layer Mask >’ menu options. This allows you to create a new mask that ‘reveals all’ which means it allows the adjustment layer to affect the whole picture; ‘hide all’ which hides the adjustment layer and then there are ‘reveal selection’ which only applies the adjustment layers to the selection or ‘hide selection’ which hides the adjustment layer for those areas that are selected.
To save confusion, I tend to only use ‘reveal all’ and ‘reveal selection’ because these make the most sense. I can then click on the layer and ‘apple+i’ or ‘ctrl+i’ to invert it.
So I hope you’ve realised now that a layer mask is just another picture that you can apply effects too directly. For instance, I find myself wanting a fairly hard transition on one side of a mask but a soft transition on the other side sometimes. This isn’t straightforward to do in photoshop directly, but knowing that masks can be treated just as images themselves allows us to apply some local changes to the mask itself by using selections.
For instance, in the Bamburgh picture above I might want to make a selection that targets just the castle but with a hard edge around the castle but a soft graduated edge at the bottom. I can do in a few different ways and the following video shows two of them. The first just uses a large paint brush with a very soft edge to paint black over the bottom of the mask. The second uses a feathered selection on the mask itself which can then be used to cut away the excess. You might also selectively blur only one side of the mask.
Our final mask for this introductory session is the graduated mask. This short video shows how to apply graduations so that you can easily see the effect.
So that concludes our article on an introduction to masks, for the next article on the series we'll look at some real world uses. As always, thank you for your time reading this and if you have any sections you would like expanding or explaining in more detail, please let me know. The pace will probably be too slow for some people and too fast for others. Also, apologies for the video quality in the first few videos - the ambient light was changing dramatically at the time. Hopefully, the final video will show how I was supposed to do it! If the quality isn't good enough, please let me know and I'll be happy to rerecord.


