Exposure, Metering and the Histogram

Tim Parkin
Amateur Photographer who plays with big cameras and film when in between digital photographs.
Digital Cameras have been widely available for over a decade now (it’s 16 years since the Nikon D1, 12 years since the Canon Digital Rebel/300D and 10 years since the Canon 5D) but we still have to deal with a lack of innovation in the interface between us and the camera. Exposure controls haven’t really moved on a whole lot since the days of film, apart from perhaps the histogram, an inaccurate way of showing how far wrong the internal meter was. I’m hoping to take you through some of the innovations that I’d like to see in the next range of cameras from the big manufacturers.
I’m not going to take credit for all of these as many of them have already been implemented in the excellent Magic Lantern firmware hack for Canon cameras (and have been discussed before that). However I’d like to pick out those that interest landscape photographers, enhance the ideas a little and add a few of my own (that probably aren’t possibly by hacking Canon cameras).
The Histogram
Why oh why are we still using a histogram that is created from an in camera jpg? A jpg that most photographers never use in the first place?! The current version of the histogram in nearly all cameras bears little relationship with the actual constraints of the digital sensor. The biggest issue being that the red, green and blue balance on the sensor is vastly different than the balance in a typical photograph. Here are a few problems
- The red and blue channels clip about a stop later than the green channel and hence in some scenes these channels may show as clipping but they could be underexposed by a stop. Likewise it’s possible to clip the green channel without warnings
- Specular highlights and other small areas of clipped highlights rarely show as clipping on the histogram and preview image because they aren’t high enough resolution.
- Many of the jpg settings can change the preview and histogram for exposure even though the scene remains the same
What we need is the following
Raw Histogram
The histogram should show the raw data as read directly from the sensor. This would allow us to see exactly how close we are to clipping.
Zoomable Histogram
We should be able to zoom into the histogram so that we can see just the highlight area (or the shadow area if desired). If we could just see the few stops of the highlights it would allow very accurate control of exposure.
Highlight Clipping Indication
We should have warning signs to show the amount of image area being clipped (or the number of pixels) for each channel. This would help us assess specular highlight problems that are difficult to see in the live view.
Shadow Noise Levels
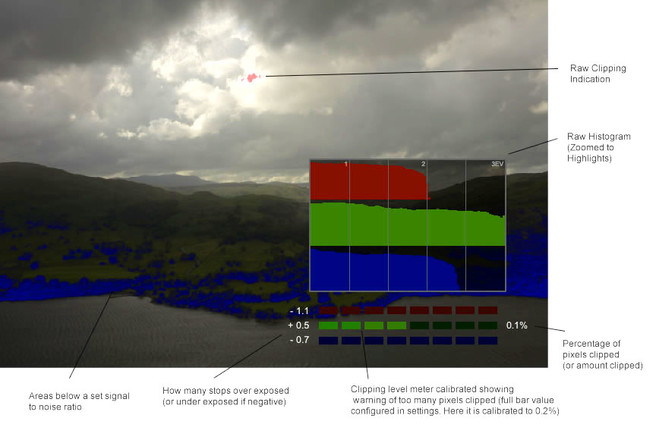
On the shadow side of the exposure there is no clipping like in the highlights. Instead relative noise levels increase as the exposure is decreased. What we can do though is set an acceptable noise limit (signal to noise ratio) and have this displayed as an overlay when exceeded (for instance the blue mask on the example display below). The camera can also know how noise increases with ISO and adjust these values (or if it was very clever it could measure the noise which would compensate for sensor heating).
The diagram below shows some of these features mocked up as an overlay. The main histogram has been zoomed in to show just the top 2.5 stops and the magnitude of the histogram is shown as a logarithmic scale (to show smaller values more clearly).
Just below the main RGB histogram is a ‘level meter’ that shows the amount of clipping. The meter is calibrated in the camera settings. For instance this shows 0.2% clipping when the bar is full.
On the left of the ‘level meter’ are three numbers showing how many stops the channel is under exposed. If a channel is over exposed a positive number is shown as a guess of how over-exposed it is (based on nearby pixels and the green and blue channel).
On the right of the ‘level meter’ is a percentage of pixels clipped for that channel. This could alternatively show the absolute number of pixels clipped
This example also shows the red clipping highlight but in this case this is the real level of clipping - not jpg values as are currently shown.
All of these will give a very clear indication of not just what is clipping but also how acceptable that clipping is according to your preferred settings.
Exposing the the Right
All of these changes are intended to make it easier to get the best settings to capture the cleanest image possible. This is commonly known as “exposing to the right (ETTR)”. The idea is that given a sensor has a constant amount of noise, the stronger we can get the signal (the exposure) the cleaner the image.
Having controls like we have shown above makes this process a lot easier. However, one of the problems that many people have with exposing to the right is that the preview on the camera quite often looks too bright.
We would propose having two separate exposure adjustments. The first being a visual adjustment (which would work like the current exposure adjustment) and the second being a ‘gain’ control. The gain would have no visible effect on the image but would be used to get the best settings for exposing to the right. When the image is imported into your raw converter, it would dial in an opposite gain setting on the image to make it look like it did on the back of the camera.
When we have areas of the photograph that are strongly over exposed when we set our main subject as exposed correctly, the gain can be reduced and this could be displayed as a highlight roll off (a dynamic version of highlight protection).
Auto Expose to the Right
This is actually possible and has already been implemented by the Magic Lantern team. The technique can work in one of three ways:-
- You take a photo and the camera reports how much increase in gain is needed to get a good ETTR. You manually dial in this gain and take another photo.
- The camera takes a single photo and works out the gain needed and applies it automatically ready for your next exposure.
- The camera is in live view mode and takes two or three quick exposures, working out the appropriate adjustments needed between each shot such that the final shot is correct and is stored on the memory card.
All you need to do is to set the amount of acceptable clipped highlights.
Auto Bracketing and ETTR
Given that our camera now knows the acceptable highlight clipping and also the acceptable shadow signal to noise ratio, our camera has all the information it needs to work out how many exposure brackets to get a perfect exposure throughout a blended image. The first photograph can be ETTR and then consecutive shots can increase the exposure by a set amount until the shadows have an acceptable signal to noise ratio (it should be possible for the camera to report the number of shots needed to achieve this in advance).
Magic Lantern
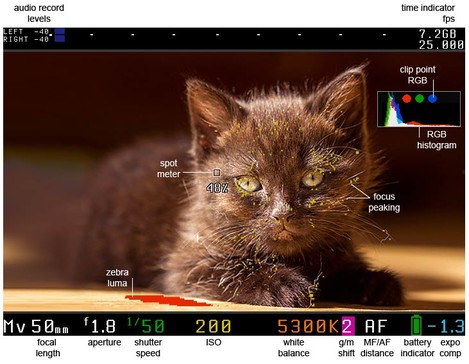
I've referred to the Magic Lantern firmware so here's a quick summary. The Magic Lantern firmware is a custom written firmware for some Canon cameras that adds features for both video and stills photography. This is an enormous feat of reverse engineering and for many of the cameras it is compatible with the software is now stable and will cause no damage to cameras (Canon have stated that the cameras will still be under warranty even if the ML software is used). Here is an example screenshot showing ML's live view display. Given that ML are working within the constrainst of somebody elses hardware, what they have acheived is to be admired but it is only a starting point for a camera company to develop something truly impressive and useful.
Conclusion
Camera exposure systems are basic to say the least. The internal meter has got progressively better since the days of film cameras but given the capabilities of the computers inside today’s cameras it is bitterly disappointing that I can get better exposure using a half century old spot meter bought off ebay for £50 (see the next issue for more).
For those of you with compatible cameras, I urge you to try the Magic Lantern firmware which includes many of the features discussed above.
I would like to expand on this article if any of you have further ideas on how digital cameras could allow you to control exposure. Please let us know what you think about the suggestions we have made and other ideas you may have.


