The disadvantage of the Bayer sensor

Tim Parkin
Amateur Photographer who plays with big cameras and film when in between digital photographs.
There has been a lot of talk on the interwebs recently about the new Nikon D800 and the fact that it has been split into two product lines, the D800 and the D800e. For those of you who don’t know, Nikon’s new DSLR is a 36 megapixel blockbuster and for the ‘e’ options, you get to pay an extra £300 and have the anti-alias filter disabled. The fact that you have to pay to have something removed is not the subject of the article, merely a sad reflection of consumer pricing policy somewhat like the extra money you can pay to have the model number removed from your high-end BMW (“if you need the number to recognise the car”, so the logic goes “then you aren’t the person I’m trying to impress”).
Anyway, this article discusses what exactly an anti-alias filter is, why we’ve needed one for so long and why we now want it removed so much that we’re willing to pay enough for a high-end compact to have it.
Firstly, what exactly is an anti-alias filter - well let's backtrack a little - what exactly is aliasing and why are we anti about it? Well in order to understand this, we could do with some signal processing skills but we can get away with talking about fonts instead.
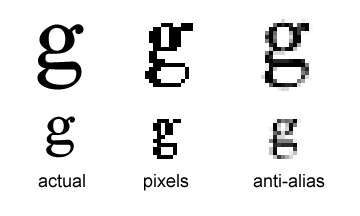
When you used to work on your computer doing some word processing or browsing the web, the letters are formed from an array of pixels. Letters can be quite clear when we have a large number of pixels but as we get smaller and smaller, letters become harder to read - this is especially true on older Windows computers. Here is an example..
What you can see here is a 400% enlargement of some text. On the left is the actual text, in the middle is what a computer would represent the text as if it only had black and white pixels and on the right is the text that has been anti-aliased. In short, this form of anti-aliasing uses shades of grey to represent areas that are part black and part white.
The aliasing problem can become more obvious when you take a look at lines, especially lines in close proximity. A well known test for aliasing problems uses a radial set of ‘spokes’. The diagram below shows what happens when we try to ‘downsize’ a set of these spokes.
The set of lines were 5 pixels wide on my display and I added them at two degree intervals which is shown in the first picture.
My first ‘reduction’ took the image and reduced it to 20% of it’s original size (to give 1px width lines). You can see that where the lines get closer together, we are getting almost concentric circles. These are caused by the areas of grey that are used to make the lines less jaggy occuring next to areas of gray in the next line. These patterns are called moire (pronounced like soiree).
Now this is typical of the sorts of patterns that digital cameras are susceptible to. The last image in the diagram shows an image that has undergone the same amount of reduction but was slightly blurred before being reduced (by 2px using gaussian blur).
This is what the anti-alias filter in a camera is typically doing. It is adding a small degree of blurring to the image coming from the lens in order to prevent the types of moire pattern shown above. These patterns typically occur in clothing but also occur in tiles on rooves, brickwork, fences, etc.
But digital sensors are a little bit more complicated than just black and white pixels. The typical colour sensor also red green and blue pixels but not for every pixel. So for red colours the camera only has a quarter of the resolution or half the number of red pixels in the horizontal and vertical direction. This means the camera is twice as susceptible to colour moire for red colours. The same is true for blue colours and green is about 1.5 times as susceptible.
What this means is that we need to have a bigger blur radius to solve colour moire than to solve black and white moire effects.
The problem with cameras is we can only have one or the other - we either have a big blur that helps with colour moire or a smaller blur that helps with black and white moire only.
Whilst cameras have been used to print at almost their maximum resolution, moire has been a reasonably visible problems. Colour moire is typically in patterns that are 2px wide and hence even small patches are fairly visible. However, as cameras increase in resolution, some of these effects become less and less obvious. This increase in camera resolution is like the increase in monitor resolution we have seen over the last few years. Text on monitors has looked better and better as monitor resolution has increased.
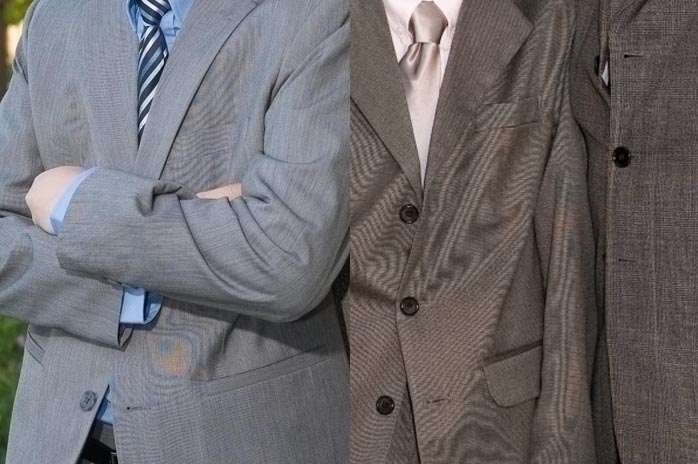
This increase in resolution has led camera developers to think more about removing or minimising the effect of the anti-alias filters - the only problem is that some anti-alias effects are visible no matter what the resolution of the camera. The worst of these are usually clothing materials for fashion photographers where the moire not only adds strange patterns but also adds colour shifts and patterns. For example, the image below (copyright “Nadine Ohara” photo.net).
This probably one of the worst examples of moire I have seen (taken with a Canon 5D) which goes to show that having an anti-alias filter cannot solve the problem completely.
Post processing can help with some of the effects of colour moire, typically by just blurring the colour channel though (with possibly some clever identification of typical moire colours and intensities).
How Does an Anti-Alias Filter Work
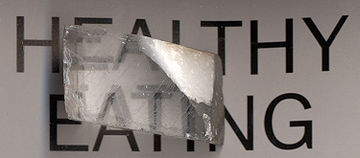
I admit to not knowing this completely before reading around the subject. An anti alias filter is typically called a ‘blur’ filter and, whilst some cameras may do this, most cameras use a birefringement (http://en.wikipedia.org/wiki/Birefringent) material that splits light into two separate paths. For example, the image below (from wikipedia) shows some text being split by a ‘birefringent’ material.
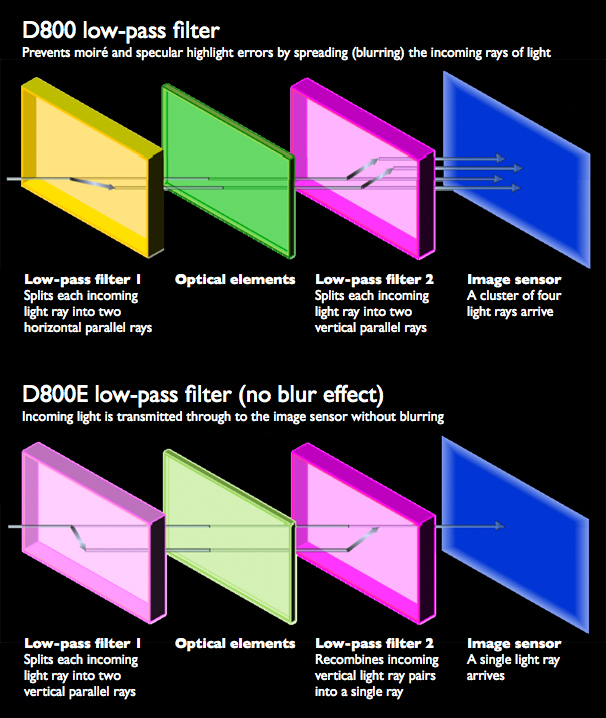
If you use two peice of this material with one peice rotated 90 degrees, you can split the image into four separate sections. Tuning the distance between the four images can give you the effect of a ‘blur’ without throwing away lots of extra information.
The following diagram shows that the nikon D800E has two ‘birefringent’ layers but that one of them cancels the other one out. This probably makes manufacturing simpler as Nikon only have to alter one component rather than having to recalibrate the sensor layer for the D800E (the different optical parts affect focus slightly so removing them would mean positioning the sensor differently).
It will yet to be seen but I have my suspicions that there will still be a small anti-alias or blurring effect introduced by the two low pass filters and the optical elements (whatever they are). Without them, there would be luminosity moire introduced which would be a lot harder to correct using software.
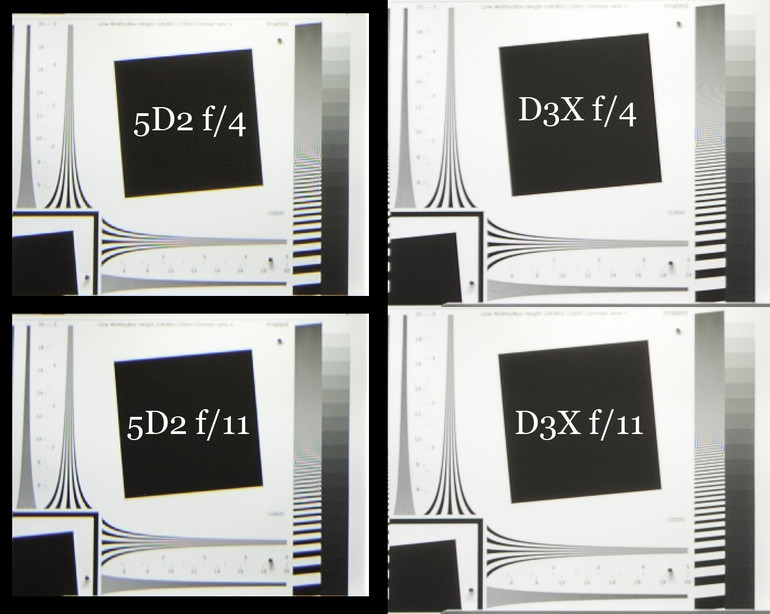
One of the interesting things we noted during our Big Camera Comparison was the difference between the 5Dmk2 and the D3X - most notably that the 5Dmk2 had a lot weaker anti alias filter. If you look at the two results, it’s fairly clear that the 5Dmk2 has colour effects around areas of high contrast detail whereas the D3X has very little. It’s also clear that the D3X is showing some luminosity moire - see the area marked ‘L’ on the picture. This shows some of the trade offs the manufacturers have to make.
The other interesting result was that the effects of moire diminished at smaller apertures (see the picture below). This comes as no surprise when you think about diffraction as a blurring effect in itself - hence for photographers having problems with moire, stopping down may well help considerably. (Since writing this I’ve been told that this technique is discussed in the D800 technical manual)
This leads us to presume that other ‘blurring’ techniques can help with moire effects, for example - blurring because of bad technique, defocusing slightly, adding a couple of extra UV filters, breathing on the lens; all of these will diminish moire effects to one degree or another.
In fact, one of the clarion calls of high megapixel critiques is that lenses are not good enough for the sensors anyway may actually be an advantage to these high resolution sensors. Using a poor lens may just introduce enough blurring or abberation to eliminate moire completely (so having that stock zoom lens to hand may be a good thing!).
Conclusions..
In summary - an anti-alias or blurring filter of some sort is a good thing under some conditions. The effects of moire are difficult to remove consistently and hence people shooting a large range of subjects are recommended to go for a camera with an anti-alias filter (or a camera with a high enough resolution to out resolve moire causing patterns, e.g. material patterns in clothing at typical distances).
Moire removal tools are quite blunt instruments and typically remove it by blurring the colour channel. Quite often moire shows itself as colour fringing in areas that already have fine colour detail and hence is impossible to remove without damaging colour texture.
Aliasing issues exist in just the brightess channel and no amount of moire reduction can remove these.
There are ways to minimise moire when you have no anti-alias filter though, stopping down being a prime example and one compatible with most landscape photographers work.
I hope this short guide has helped you understand the issues with the removal of the anti-alias filter and ways to overcome them. Feel free to ask any questions below...

